Setting Service Level Agreements (SLAs)
You can set company-wide remediation service level agreements (SLAs) for any issue within Prism. This enables you to measure the progress of your remediation efforts against agreed SLAs, such as how quickly issues are being fixed, or whether any issues are non-compliant.
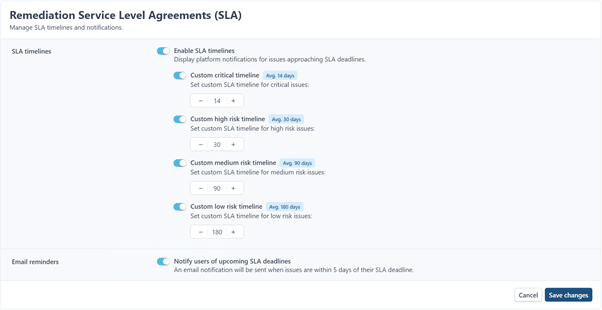
Step 1: To set and manage SLAs, navigate to Company on the Menu.
Step 2: Enable SLAs for your company by selecting the ‘Enable SLA timelines’ slider.

Step 3: Prism will present you with default SLA timelines. Click the + or – icons to change the timelines for each risk category.

Step 4: You can also choose whether to enable email notifications for SLAs by selecting the ‘Email reminders’ slider. This will send an email notification to users you have onboarded to Prism when issues are within five days of their deadline.
Step 5: Click ‘Save Changes’.
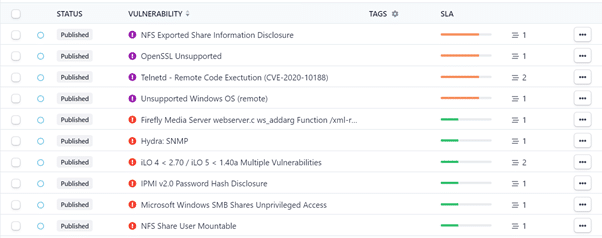
You can see your SLAs in action via the Phases or Issues interfaces, which are found under Results on the Menu.
Phases Interface

Issues Interface

Hovering over the SLA status bars will provide you with further details on the length and duration of the SLA.
A red status bar indicates that the SLA deadline has been exceeded for the issue.

An orange status bar will show the number of days remaining to remediate the issue.

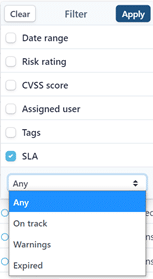
Filter by SLA
You can also filter by SLA on the Issues Interface.

The filter options are as follows:
- On Track: Issues that are still within your agreed remediation timelines.
- Warning: Issues that have 5 days remaining until they hit their remediation timeline.
- Expired: Issues that are now past their agreed remediation timeline.
source https://www.rootshellsecurity.net/setting-service-level-agreements-slas/
Comments
Post a Comment